


 Like
Like Share
Share
 Report
Hi friends, worried about executing custom business logic from D365F&O using Copilot? Look no further. You can easily create and deploy your custom X++ code to fall into Dataverse as Plugins and then carry out varied business processes and automations effortlessly, using Copilot. It’s an amazing conduit that can let your X++ logic be exposed to Copilot Studio, in the form of Customized Actions.
Sounds interesting? Please read along.
Here is a step-by-step guide, explaining the same.
Copilot has amazing capabilities of connecting Microsoft flows to cater to a number of functionalities, just by using OData entities. However, in all of above examples, certainly OData entities cannot help. You cannot use an OData entity to confirm a PO or performing a three-way matching.
Enter X++ plugins. You can create plugins, embracing your custom X++ code to deploy in Dataverse. And then expose them as Actions in Copilot studio, and let the Plugin understand your instructions.
The below is one such example, where you are approving leaves of an employee using X++ plugin.
[CustomAPI('Applied leaves approval', 'Approves or rejects a workflow request for leave from FinOps, using copilot')]
[AIPluginOperationAttribute]
[DataContract]
internal final class D365ACManageApprovalsPlugin implements ICustomAPI
Which defines the class and it’s signature. It extends the ICustomAPI which is an interface responsible for identifying the class to work as a Plugin.
I am creating the following parm methods to accept Leave request, User Id and Legal Entity:
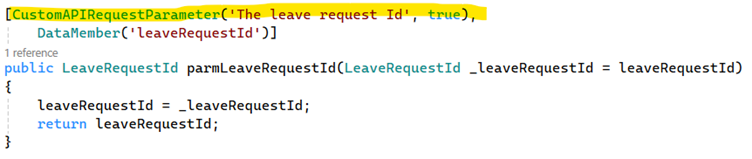
[CustomAPIRequestParameter('The leave request Id', true),
DataMember('leaveRequestId')]
public LeaveRequestId parmLeaveRequestId(LeaveRequestId _leaveRequestId = leaveRequestId)
{
leaveRequestId = _leaveRequestId;
return leaveRequestId;
}
[CustomAPIRequestParameter('The user Id', true),
DataMember('userId')]
public UserId parmUserId(UserId _userId = userId)
{
userId = _userId;
return userId;
}
[CustomAPIRequestParameter('The dataarea Id', true),
DataMember('legalEntityId')]
public DataAreaId parmLegalEntityId(DataAreaId _legalEntityId = legalEntityId)
{
legalEntityId = _legalEntityId;
return legalEntityId;
}
You need to implement a ‘run’ method when you implement ICustomAPI, and in our case it contains the logic for accepting the approval request:
public void run(Args _args)
{
changecompany(legalEntityId)
{
LeaveRequest leaveRequest = LeaveRequest::findByRequestId(leaveRequestId);
WorkflowWorkItemTable workflowWorkItemTable;
select firstonly workflowWorkItemTable
order by RecId desc
where workflowWorkItemTable.RefTableId == tableNum(LeaveRequest)
&& workflowWorkItemTable.RefRecId == leaveRequest.recid
&& workflowWorkItemTable.Status == WorkFlowWorkItemStatus::Pending
&& workflowWorkItemTable.Type == WorkflowWorkItemType::WorkItem;
if (workflowWorkItemTable)
{
WorkflowWorkItemActionType actionType = WorkflowWorkItemActionType::Complete;
MenuItemName menuItemName = menuItemActionStr(LeaveRequestApprovalApprove);
WorkflowWorkItemActionManager::dispatchWorkItemAction(workflowWorkItemTable
, ""
, userId
, actionType
, menuItemName);
}
}
}
It’s a simple select of the WorkFlowWorkItem related to the Leave request Id. And then I am passing it on to WorkflowWorkItemActionManager to complete it. I am optionally not sending the Comments from the user to WorkflowWorkItemActionManager – but it’s ok: you can create another parm method to pass it on.
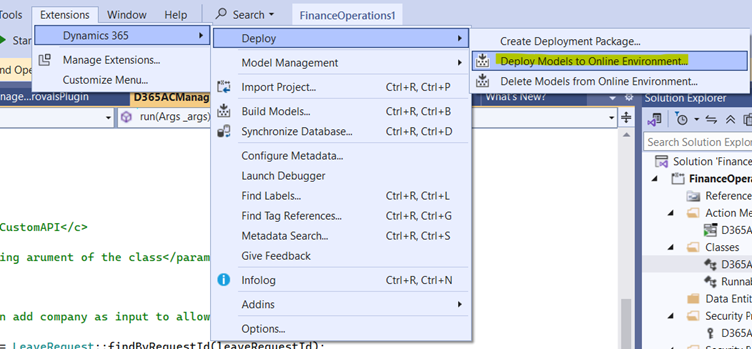
Create an Action menu item and a privilege and a role associated with it.
Once you have created them, go ahead and deploy it in your Online environment:

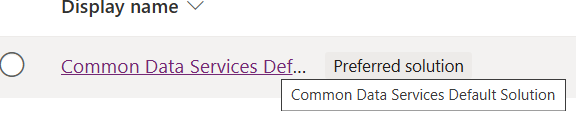
I selected the Common Data Services Def Solution to proceed (to create the plugins):
I am using the CDS Default publisher:
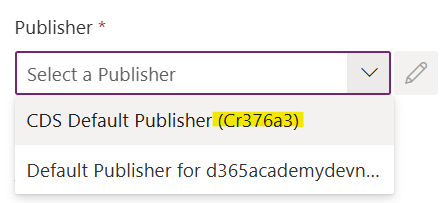
Just note the ‘Cr’ code, which we would be using down the line.
Click on New >> More >> Other >> Custom API

The following screen will open:
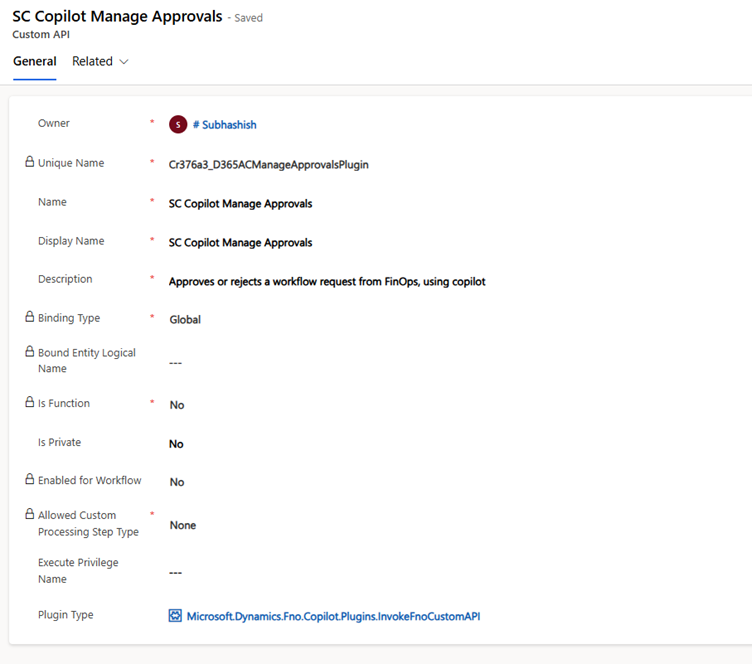
You need to give a unique name, which should be <cr code>_<name of the X++ plug in class>.
In my case it was: Cr376a3_D365ACManageApprovalsPlugin
Give a name and display name, with description from the class that you created back in D365F&O. Select Plugin type: Microsoft.Dynamics.Fno.Copilot.Plugins.InvokeFnoCustomAPI
Click on Save and close to create the PlugIn.
Choose the custom API first, that you created in Step 2. Sometimes it doesn’t appear right away, so you can close the window and reload the solutions page and open it again.
The Unique name: <cr number>_<name of your x++ class>_<name of your data member>.
In my case, for leave request it looks like:
Cr376a3_D365ACManageApprovalsPlugin_leaveRequestId
And name and Display name: data member name from x++ class.
Description = must be equal to the data member signature that you provided in x++:
Type: select type (in my case it was String).
And Is Optional = No
You need to repeat the operation for all the parameters you have created. So at the end when you come back to the solution >> Custom API request filter >> it should show you the API requests parameters that you have created:
Additionally you can also create Output/response parameter, by going to your solution>> New à more à other à Custom API response Property, where you need to feed from the data, you are going to declare in your x++ class (suppose you are returning any value from the plug in).
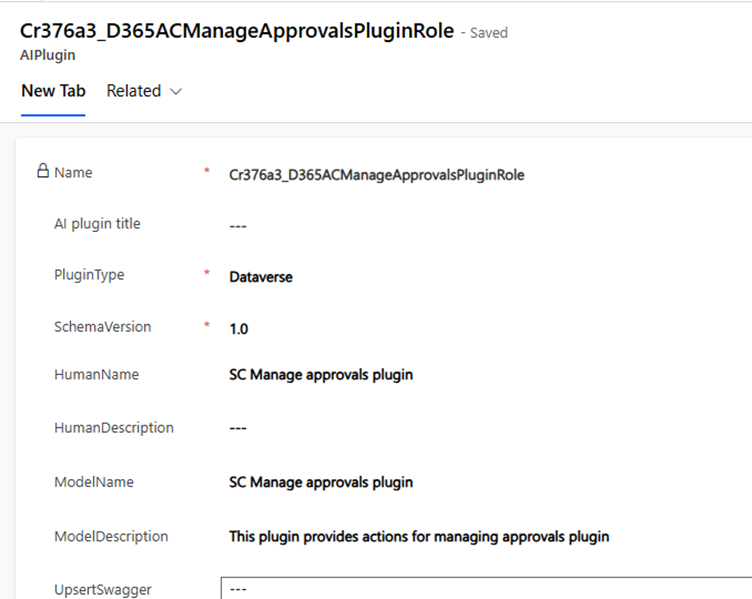
In this case, the name = <cr number>_<the role which you created in D365F&O>
Choose Plugin type = Dataverse
Give a human name and Model name = the role label which you provided in D365F&0
Give an appropriate model description. Click Save and Close.
Name= <cr number>_<x++ class name>
AI plugin == choose the AI plug in you created in step 4.
Operation Id = <cr number>_<x++ class name>
AI Plugin Operation key= it should maintain the following format à
aiplugin.name=<cr_number>_<Role name>,operationid=<cr_number>_<x++ class name>
Custom API = select the API which you created in step-2.
Description = give a description (it should be from the class signature which you provided in X++).
Create the Copilot Agent Action
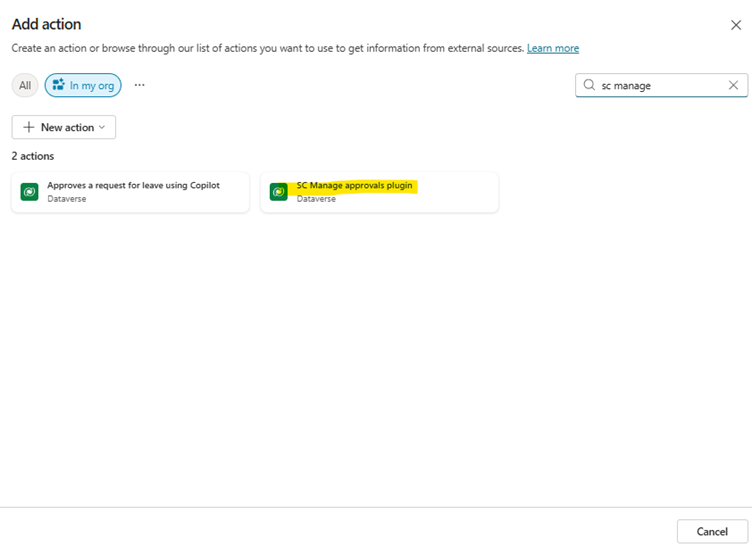
Now you can launch https://copilotstudio.microsoft.com/ and choose your environment à choose the agent (in our case: Copilot for finance and operations apps) and then come all the way down Tools (Actions) >> Add >> and search for the Plugin you created. It must appear in the popup screen:
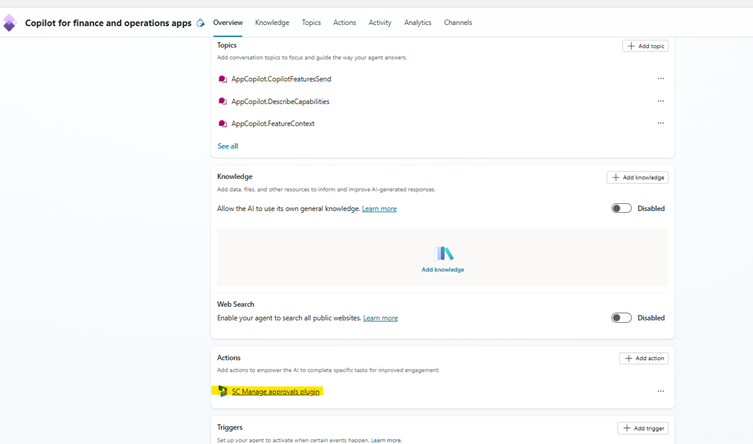
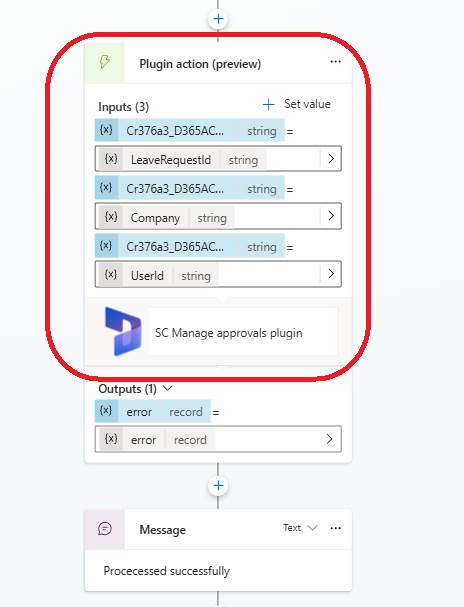
Click on it and add. This will appear now on your Agent Page:
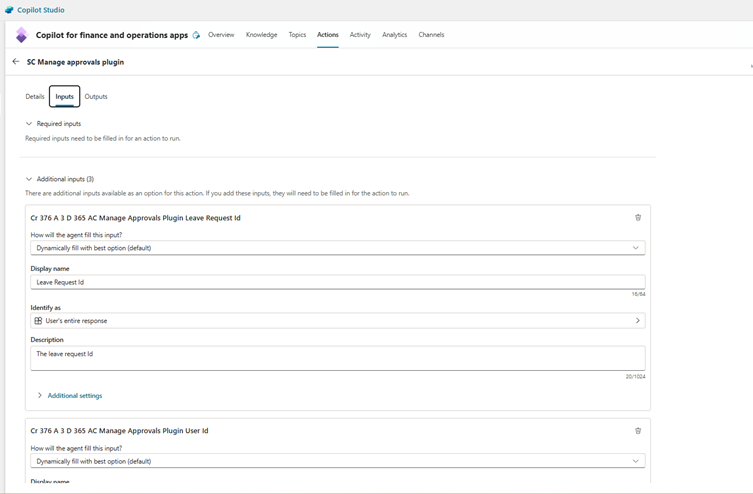
Click on it to open >> Inputs tab >> Additional Inputs >> add your created parameters, one by one, as prompted. And at the end it looks like this, with all the Inputs created:
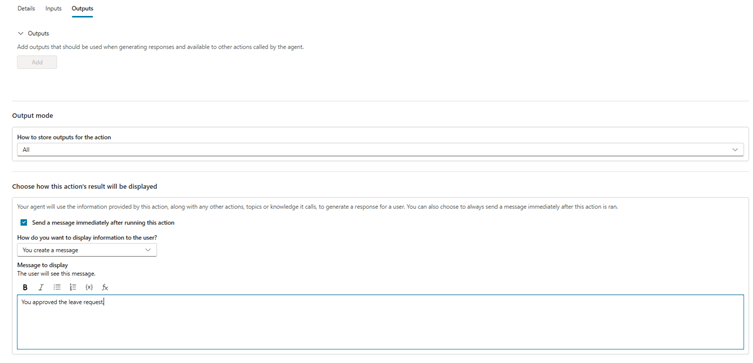
Likewise you can also add any Output parameter and save in the action:
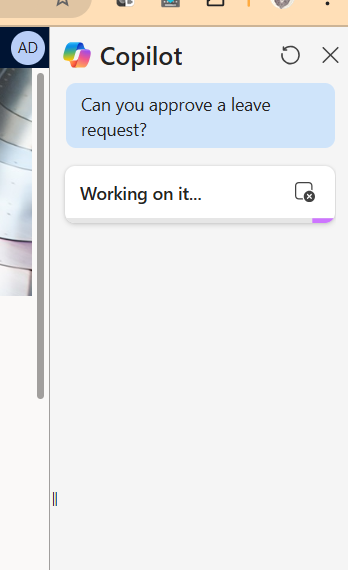
So that when we are asking in D365F&O for the following prompt in Copilot:
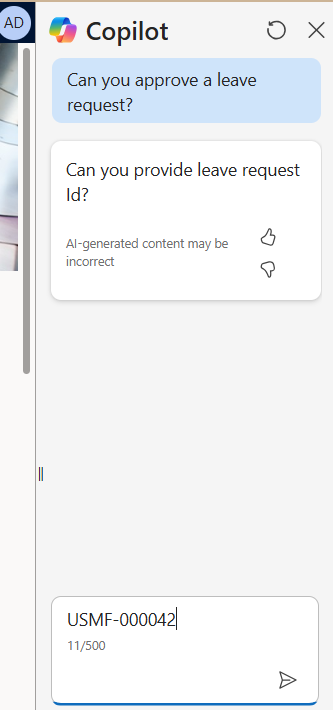
And it asks me about the Leave request id, which I provided in the chat:
And the response was from the action that I created in my Agent:
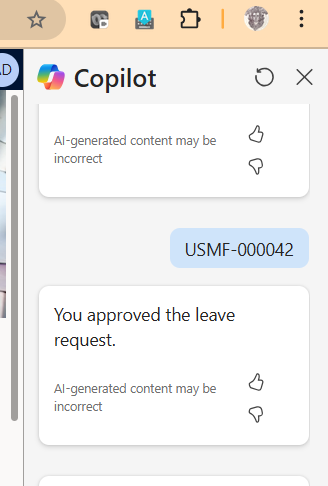
If I go back to D365F&O and check on that leave’s status, it would show as approved/completed (in a short while, after the workflow action manager batch works on it):

Let me conclude the discussion here, requesting you to please try the exercise from your end and let me know how it goes.
Much love and namaste as always 😊
Sounds interesting? Please read along.
Here is a step-by-step guide, explaining the same.
What am I trying to achieve
Imagine that being a manager, your users want to approve leaves of their employees, using copilot. Or want to receive a PO using Copilot, by just providing Purchase Order Number. Or invoicing a sales order wit h the necessary details, using Copilot chat.Copilot has amazing capabilities of connecting Microsoft flows to cater to a number of functionalities, just by using OData entities. However, in all of above examples, certainly OData entities cannot help. You cannot use an OData entity to confirm a PO or performing a three-way matching.
Enter X++ plugins. You can create plugins, embracing your custom X++ code to deploy in Dataverse. And then expose them as Actions in Copilot studio, and let the Plugin understand your instructions.
The below is one such example, where you are approving leaves of an employee using X++ plugin.
Prerequisites
Following are the checkpoints you must consider, before proceeding:- You must have a unified developer environment. The development of AI plugins that use finance and operations business logic is available only in the unified developer experience. For information about how to create a unified developer environment from the unified admin experience for finance and operations apps, see Tutorial: Install the Finance and Operations Provisioning App. You can refer to my video blog that explains how to spin up an UAD instance from the scratch:
- You should be having your environment on version 10.0.40 proactive quality update 1 (PQU-1) with platform version 7.0.7279.80 or later.
- The following solutions must be installed in the Power Platform environment. If they aren't already installed, see Manage Dynamics 365 apps for information about how to install Dynamics 365 solution packages in Dataverse.
- The Copilot for finance and operations package, which includes the following solutions:
- Copilot for finance and operations apps
- Copilot for finance and operations generation solution
- Copilot for finance and operations anchor solution
- Finance and Operations Virtual Entity
- The (Preview) Custom API Generation feature must be enabled in Feature management.
Step 1
We are creating a class in D365F&O that is capable of approving a leave request workflow, by the following structure:[CustomAPI('Applied leaves approval', 'Approves or rejects a workflow request for leave from FinOps, using copilot')]
[AIPluginOperationAttribute]
[DataContract]
internal final class D365ACManageApprovalsPlugin implements ICustomAPI
Which defines the class and it’s signature. It extends the ICustomAPI which is an interface responsible for identifying the class to work as a Plugin.
I am creating the following parm methods to accept Leave request, User Id and Legal Entity:
[CustomAPIRequestParameter('The leave request Id', true),
DataMember('leaveRequestId')]
public LeaveRequestId parmLeaveRequestId(LeaveRequestId _leaveRequestId = leaveRequestId)
{
leaveRequestId = _leaveRequestId;
return leaveRequestId;
}
[CustomAPIRequestParameter('The user Id', true),
DataMember('userId')]
public UserId parmUserId(UserId _userId = userId)
{
userId = _userId;
return userId;
}
[CustomAPIRequestParameter('The dataarea Id', true),
DataMember('legalEntityId')]
public DataAreaId parmLegalEntityId(DataAreaId _legalEntityId = legalEntityId)
{
legalEntityId = _legalEntityId;
return legalEntityId;
}
You need to implement a ‘run’ method when you implement ICustomAPI, and in our case it contains the logic for accepting the approval request:
public void run(Args _args)
{
changecompany(legalEntityId)
{
LeaveRequest leaveRequest = LeaveRequest::findByRequestId(leaveRequestId);
WorkflowWorkItemTable workflowWorkItemTable;
select firstonly workflowWorkItemTable
order by RecId desc
where workflowWorkItemTable.RefTableId == tableNum(LeaveRequest)
&& workflowWorkItemTable.RefRecId == leaveRequest.recid
&& workflowWorkItemTable.Status == WorkFlowWorkItemStatus::Pending
&& workflowWorkItemTable.Type == WorkflowWorkItemType::WorkItem;
if (workflowWorkItemTable)
{
WorkflowWorkItemActionType actionType = WorkflowWorkItemActionType::Complete;
MenuItemName menuItemName = menuItemActionStr(LeaveRequestApprovalApprove);
WorkflowWorkItemActionManager::dispatchWorkItemAction(workflowWorkItemTable
, ""
, userId
, actionType
, menuItemName);
}
}
}
It’s a simple select of the WorkFlowWorkItem related to the Leave request Id. And then I am passing it on to WorkflowWorkItemActionManager to complete it. I am optionally not sending the Comments from the user to WorkflowWorkItemActionManager – but it’s ok: you can create another parm method to pass it on.
Create an Action menu item and a privilege and a role associated with it.
Once you have created them, go ahead and deploy it in your Online environment:
Step 2 (PlugIn)
Switch over to https://make.powerapps.com >> your environment and then you need to go solutions:I selected the Common Data Services Def Solution to proceed (to create the plugins):
I am using the CDS Default publisher:
Just note the ‘Cr’ code, which we would be using down the line.
Click on New >> More >> Other >> Custom API
The following screen will open:
You need to give a unique name, which should be <cr code>_<name of the X++ plug in class>.
In my case it was: Cr376a3_D365ACManageApprovalsPlugin
Give a name and display name, with description from the class that you created back in D365F&O. Select Plugin type: Microsoft.Dynamics.Fno.Copilot.Plugins.InvokeFnoCustomAPI
Click on Save and close to create the PlugIn.
Step 3 (Plugin request parameters)
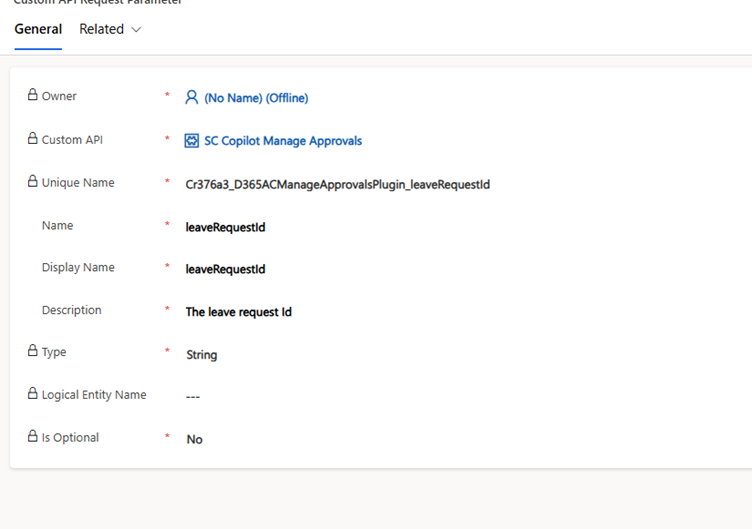
In your solution >> click on New à More à Other à Custom API request Parameter. The following screen will open:Choose the custom API first, that you created in Step 2. Sometimes it doesn’t appear right away, so you can close the window and reload the solutions page and open it again.
The Unique name: <cr number>_<name of your x++ class>_<name of your data member>.
In my case, for leave request it looks like:
Cr376a3_D365ACManageApprovalsPlugin_leaveRequestId
And name and Display name: data member name from x++ class.
Description = must be equal to the data member signature that you provided in x++:
Type: select type (in my case it was String).
And Is Optional = No
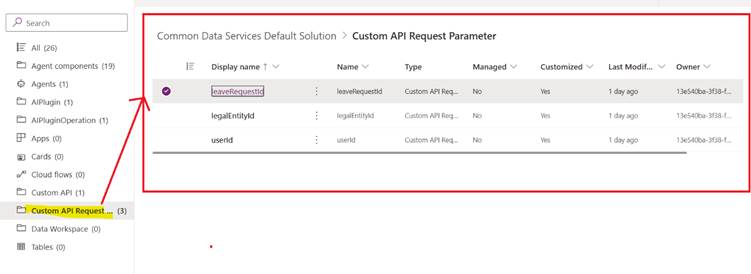
You need to repeat the operation for all the parameters you have created. So at the end when you come back to the solution >> Custom API request filter >> it should show you the API requests parameters that you have created:
Additionally you can also create Output/response parameter, by going to your solution>> New à more à other à Custom API response Property, where you need to feed from the data, you are going to declare in your x++ class (suppose you are returning any value from the plug in).
Step 4 (AI Plugins)
Coming back to your solution>> New à more à other à AI Plugin, and the following screen appears:In this case, the name = <cr number>_<the role which you created in D365F&O>
Choose Plugin type = Dataverse
Give a human name and Model name = the role label which you provided in D365F&0
Give an appropriate model description. Click Save and Close.
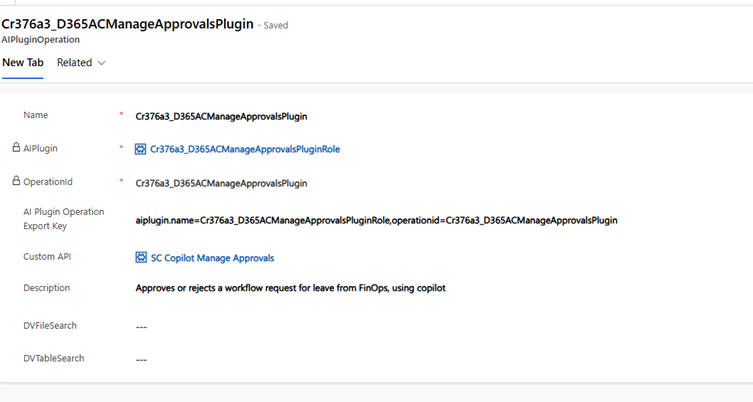
Step 5 (AI Plugin operation)
Coming back to your solution, click on New à More à Other à AI Plugin operation and the new window opens like this:Name= <cr number>_<x++ class name>
AI plugin == choose the AI plug in you created in step 4.
Operation Id = <cr number>_<x++ class name>
AI Plugin Operation key= it should maintain the following format à
aiplugin.name=<cr_number>_<Role name>,operationid=<cr_number>_<x++ class name>
Custom API = select the API which you created in step-2.
Description = give a description (it should be from the class signature which you provided in X++).
Create the Copilot Agent Action
Now you can launch https://copilotstudio.microsoft.com/ and choose your environment à choose the agent (in our case: Copilot for finance and operations apps) and then come all the way down Tools (Actions) >> Add >> and search for the Plugin you created. It must appear in the popup screen:
Click on it and add. This will appear now on your Agent Page:
Click on it to open >> Inputs tab >> Additional Inputs >> add your created parameters, one by one, as prompted. And at the end it looks like this, with all the Inputs created:
Likewise you can also add any Output parameter and save in the action:
Testing the plugin
We can now create a topic that can accept a leave request Id and approve the same by calling our above agent:So that when we are asking in D365F&O for the following prompt in Copilot:
And it asks me about the Leave request id, which I provided in the chat:
And the response was from the action that I created in my Agent:
If I go back to D365F&O and check on that leave’s status, it would show as approved/completed (in a short while, after the workflow action manager batch works on it):
Let me conclude the discussion here, requesting you to please try the exercise from your end and let me know how it goes.
Much love and namaste as always 😊
*This post is locked for comments